用了这个blog几天之后,发现Jekyll很难用Jupyter Notebook的文件来生成post,而且也想增加标签和目录等插件。于是想创建一个以Pelican为基础的GitHub网站,以便导入ipynb格式的文档。花了一天的时间研读了这篇介绍,写的很详细,虽然在操作过程中有一些出入,但通过一点点排查,最后全部跑通了。但并没有生成网页,姑且不管最后的情况,先把过程记录下来,尤其是自己排查解决问题的过程,尤其重要,供以后参考。
Pelican是用Python写的一个静态网站生成器,它能够将Jupyter notebook文件转换成HTML博客文章。Pelican也十分容易部署到GitHub Pages, 其他人可以在那里阅读我们的文章。
一、准备工作
创建一个文件夹 – 我们将把博客内容和风格文件放到这个文件夹中。在本篇教程里,我们取名为jupyter-blog。除特殊说明,以下操作都是在
-
创建一个叫做.gitignore的文件,并添加入这个文件的内容。最终我们将会把文件提交到Git, .gitignore将会排除指定类型的文件。(不知道什么用)
-
在jupyter-blog中创建一个叫做requirements.txt的文件并写入以下内容:
Markdown==2.6.6
pelican==3.6.3
jupyter>=1.0
ipython>=4.0
nbconvert>=4.0
beautifulsoup4
ghp-import==0.4.1
matplotlib==1.5.1
在jupyter-blog下执行
pip install -r requirements.txt
安装requirements.txt中的所有包。也可以逐个安装
二、安装Pelican
执行pelican-quickstart将会开始一个交互式的博客安装过程。你将会看到有一系列的问题来使得博客安装妥当。
对于大多数问题,直接点击Enter接受默认值即可,需要自定义的地方有the title of the website(网站标题), the author of the website(作者),n for the URL prefix(URL前缀选择n), and the timezone(时间区)。下面是一个示例(以下内容以后都可在pelicanconf.py中再次修改):
# xuliucheng @ xlcdemac in ~/pelican-blog [14:39:44]
$ pelican-quickstart
Welcome to pelican-quickstart v3.6.3.

This script will help you create a new Pelican-based website.

Please answer the following questions so this script can generate the files
needed by Pelican.


> Where do you want to create your new web site? [.]
> What will be the title of this web site? LiuchengXu's Blog
> Who will be the author of this web site? LiuchengXu
> What will be the default language of this web site? [en]
> Do you want to specify a URL prefix? e.g., http://example.com   (Y/n) n
> Do you want to enable article pagination? (Y/n)
> How many articles per page do you want? [10]
> What is your time zone? [Europe/Paris]
> Do you want to generate a Fabfile/Makefile to automate generation and publishing? (Y/n)
> Do you want an auto-reload & simpleHTTP script to assist with theme and site development? (Y/n)
> Do you want to upload your website using FTP? (y/N)
> Do you want to upload your website using SSH? (y/N)
> Do you want to upload your website using Dropbox? (y/N)
> Do you want to upload your website using S3? (y/N)
> Do you want to upload your website using Rackspace Cloud Files? (y/N)
> Do you want to upload your website using GitHub Pages? (y/N) y
> Is this your personal page (username.github.io)? (y/N) y
Done. Your new project is available at /Users/xuliucheng/pelican-blog

# xuliucheng @ xlcdemac in ~/pelican-blog [14:43:04]
$ ls
Makefile  content  develop_server.sh  fabfile.py  output  pelicanconf.py  publishconf.py  requirements.txt
运行完pelican-quickstart后,你会发现在jupyter-blog目录下多了两个文件夹:content 和 output, 还有几个文件。比如pelicanconf.py和publishconf.py,下面是应当出现的几个文件:
jupyter-blog
├── Makefile
├── content
├── develop_server.sh
├── fabfile.py
├── output
├── pelicanconf.py
├── publishconf.py
└── requirements.txt

2 directories, 6 files
三、安装插件
Pelican默认情况下并不支持使用jupyter写博客 – 我们需要安装插件来进行支持。我们将把插件以git submodule的方式进行安装以便于管理。
-
执行git init将当前文件夹初始化为一个git仓库。
-
创建plugins文件夹。在创建的时候,可以‘新建文件夹’,也可以在terminal里输入
makdir 文件夹名
-
执行git submodule add git://github.com/danielfrg/pelican-ipynb.git plugins/ipynb来添加插件。
# xuliucheng @ xlcdemac in ~/pelican-blog [14:45:19]
$ git init
Initialized empty Git repository in /Users/xuliucheng/pelican-blog/.git/

# xuliucheng @ xlcdemac in ~/pelican-blog on git:master x [14:52:21]
$ mkdir plugins

# xuliucheng @ xlcdemac in ~/pelican-blog on git:master x [14:52:37]
$ cd plugins

# xuliucheng @ xlcdemac in ~/pelican-blog/plugins on git:master x [14:52:48]
$ git submodule add git://github.com/danielfrg/pelican-ipynb.git plugins/ipynb
Cloning into '/Users/xuliucheng/pelican-blog/plugins/plugins/ipynb'...
remote: Counting objects: 387, done.
remote: Total 387 (delta 0), reused 0 (delta 0), pack-reused 387
Receiving objects: 100% (387/387), 299.26 KiB | 93.00 KiB/s, done.
Resolving deltas: 100% (190/190), done.
现在你应该有一个.gitmodules文件和一个plugins文件夹:
jupyter-blog
├── Makefile
├── content
├── develop_server.sh
├── fabfile.py
├── output
├── pelicanconf.py
├── plugins
├── publishconf.py
└── requirements.txt

3 directories, 6 files
为了启动插件,我们需要修改pelicanconf.py并将以下内容添加到尾部:
MARKUP = ('md', 'ipynb')

PLUGIN_PATHS = [ './plugins' ]  # 如果像原文直接PLUGIN_PATH = `./plugins`而不使用列表会报warning
PLUGINS = ['ipynb.markup']
这几行代码是告诉pelican在生成HTML时激活插件。
四、撰写博客
插件安装完毕后,我们可以来创建第一篇文章:
-
新建一个jupyter notebook并写入一些内容。
-
将notebook文件复制到content文件夹。
-
创建一个跟notebook同名的一个文件,不过扩展名为`.ipynb-meta’。将下面的内容添加到ipynb-meta文件中,请注意修改部分条目以适应你自己的博客。
Title: First Post
Slug: first-post   #服务器上这篇文章的访问路径。如果slug是first-post, 你的服务器是jupyter-blog.com, 那么你可以通过http://jupyter-blog.com/first-post来进行访问。
Date: 2016-06-08 20:00
Category: posts  #文章所属目录,可以为空。
Tags: python firsts  #以逗号分割的标签列表,可以为空。
Author: Vik Paruchuri
Summary: My first post, read it to find out.
五、生成HTML
为了生成博文的HTML,我们需要运行pelican将notebook转换成HTML,然后运行本地服务器就能够看到效果了:
-
运行pelican content生成HTML
-
切换到output文件夹
-
运行python -m pelican.server
-
打开浏览器访问localhost:8000进行预览
你应该能够看到所生成的博客效果。
六、创建GitHub Pages
-
创建一个GitHub仓库,名称为username.github.io, username是你的GitHub名称。这里可以查看更多细节。
-
运行git remote add origin git@github.com:username/username.github.io.git来为你的本地GitHub仓库添加一个远程仓库(remote)。注意将username替换为你的GitHub用户名。
在此时,操作中引入许多git的命令,因为对git的理解不透彻,且不能显性化的看到状态,所以变得越来越难,一旦与结果不一样,需要仔细排除问题。上面介绍的是blog的SSH地址,后续在git push时需要申请一个ssh的key。另外最好使用GitHub中Repository给出的地址。
GitHub Page将会显示推送到仓库username.github.io的所有HTML文件,并可通过username.github.io进行访问。(此时反映的页面仍是404)
- 修改pelican以便于它能够指向正确的地址:
修改pelicanconf.py和publishconf.py中的SITEURL, 将它设置为https://username.github.io, username是你的GitHub用户名。
- 运行pelican content -s publishconf.py。当你想要在本地进行预览时,运行pelican content. 在部署之前,运行pelican content -s publishconf.py,这会使用正确的部署设置文件。
七、提交你的文件
如果你想要GitHub pages这个仓库保存实际的notebook和一些其他文件,你可以使用git分支。本节会用到许多git命令,可以参考常用Git命令清单、廖雪峰官网、Git远程操作详解、Git工具-子模块和在GitHub上管理项目
- 运行git checkout dev切换到一个叫做dev的分支。我们不能使用master分支来保存notebook, 因为这个分支为GitHub pages所用。
# 列出所有本地分支
$ git branch
# 新建一个分支,并切换到该分支
$ git checkout -b dev
# 切换到指定分支
$ git checkout dev
- 像往常一样提交并推送到GitHub(使用git add, git commit, git push)。
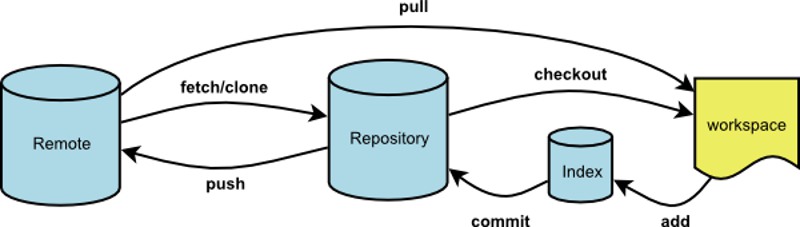
首先来熟悉一下git的结构与基本操作
# 添加当前目录的所有文件到暂存区
$ git add .
# 提交工作区自上次commit之后的变化,直接到仓库区
$ git commit -a
# 上传本地指定分支到远程仓库
$ git push [remote] [branch]
接下来问题来了,git不允许dev推送repository,返回错误信息:
fatal: Could not read from remote repository.Please make sure you have the caccess rights and the repository exists.
原来正是上述在初始化remote时,采用的是SSH地址,现在需要SSH的KEY。解决方案
之后就可以正常操作了。在完成操作后,可以查看日志等
git log
git log --graph --pretty=oneline --abbrev-commit
八、部署到GitHub
我们需要将博客内容推送到GitHub pages的master分支来使之正常工作。现在,HTML内容已经在output文件夹中,不过我们需要它是仓库的根目录,而不是一个子目录。
-
我们可以用ghp-import:运行ghp-import output -b master将output中的所有内容导入到master分支。
-
运行git push origin master将内容推送到GitHub。这一步中,出现了好多问题,主要还是出在了对于master和dev等工作流状态分不清。首先说我
The current branch master has no upstream branch.
应该是master这个branch没有和remote端进行关联,于是使用系统提示的:
git branch –set-upstream-to=origin/
再一次push,又有了新的错误:
Updates were rejected because the tip of your current branch is behind its remote counterpart.
查了半天资料,应该是因为master和dev分别改动,不知道以哪个为准了(有个名词叫fast-forward),所以无法Push。尝试了merge,pull等操作之后,实在克服不了,于是就强制性的push了一下:
git push -u origin master -f
于是终于成功了,在GitHub上查看无论是master还是dev都是相同的内容,只不过由于force之后,建站最初master下的readme文件被删除了。
因为GitHub Pages只认username/username.github.io作为主页,其他的可以在主页下生成project页面。